

Homamed ciabatta bread recipe
Have you ever torn into a fresh piece of ciabatta bread, watching the steam escape from those gorgeous, irregular holes while the crispy crust crackles under your fingers? There’s something magical about that moment—the rustic beauty, the incredible texture, the promise of flavors that transport you straight to an Italian countryside bakery.
If you’ve always thought making this iconic bread at home was beyond your skills, I’m here to tell you that mastering a ciabatta bread recipe is not only possible but incredibly rewarding. Your kitchen is about to become your favorite Italian bakery, and the journey starts right here.
Making ciabatta bread at home might seem intimidating at first glance, but once you understand the technique and embrace the wet, sticky dough that gives this bread its signature open crumb, you’ll find yourself baking batch after batch. This comprehensive guide will walk you through everything you need to know about creating an authentic ciabatta bread recipe that rivals anything you’d find in a professional bakery.

Homemade Ciabatta Bread Recipe
Ingredients
Method
- Dissolve yeast and honey in warm water; let rest 5–10 minutes until foamy
- Add bread flour and mix until a shaggy dough forms
- Cover and let autolyse for 30 minutes
- Add salt and olive oil; mix until incorporated
- Perform 4 sets of stretch-and-fold, one every 30 minutes
- Bulk ferment at room temperature for 3–4 hours total (or overnight in refrigerator)
- Turn dough out onto floured surface; divide into 2 pieces
- Gently shape into rough rectangles without degassing
- Final proof for 45–60 minutes; preheat oven to 475°F (245°C)
- Bake with steam for 10 minutes, then remove steam pan and bake 20–25 minutes more
- Cool on wire rack for 30 minutes before slicing
What Makes Ciabatta Bread Special?
The History and Origins of Ciabatta
Ciabatta is surprisingly young compared to other Italian breads. This beloved rustic bread was created in 1982 by Arnaldo Cavallari, a baker from the Veneto region of Italy, who wanted to compete with the French baguette that was gaining popularity in Italy. The name “ciabatta” means “slipper” in Italian, referring to the bread’s flat, elongated shape that resembles a bedroom slipper.
What started as a regional innovation quickly spread throughout Italy and eventually around the world. Today, ciabatta has become synonymous with artisan bread-making, and learning a proper ciabatta bread recipe has become a rite of passage for home bakers looking to elevate their skills. The bread’s popularity stems from its versatility—it’s perfect for sandwiches, excellent for dipping in olive oil, and absolutely divine when simply toasted with butter.
Distinctive Characteristics of Authentic Ciabatta
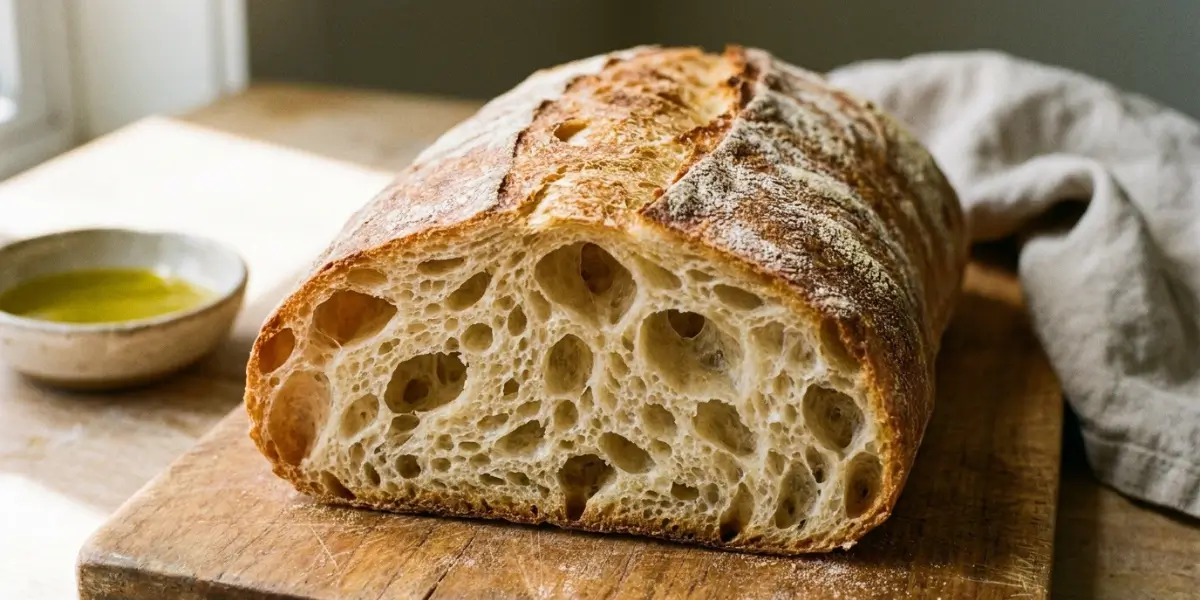
What sets ciabatta apart from other breads is its unique texture and appearance. An authentic ciabatta bread recipe produces a loaf with an incredibly open crumb structure—those large, irregular holes that bread enthusiasts dream about. The crust should be thin, crispy, and flour-dusted, while the interior remains soft, chewy, and slightly moist.
The secret to achieving this texture lies in the high-hydration dough, typically around 75-80% water content. This wet dough can be challenging to work with, but it’s essential for creating those characteristic air pockets. Unlike denser breads, ciabatta has a light, airy quality despite its rustic appearance. The flavor profile is mildly tangy with subtle wheat notes, making it the perfect canvas for both sweet and savory toppings.
Essential Ingredients and Tools for Your Ciabatta Bread Recipe

Key Ingredients for Perfect Ciabatta
The beauty of a ciabatta bread recipe lies in its simplicity—just a handful of quality ingredients come together to create something extraordinary. Here’s what you’ll need:
| Ingredient | Amount | Purpose |
|---|---|---|
| Bread flour | 500g (4 cups) | Provides protein for gluten development |
| Water (room temperature) | 400ml (1⅔ cups) | Creates high hydration dough |
| Active dry yeast | 2 teaspoons | Leavening agent |
| Salt | 2 teaspoons | Flavor and gluten strengthening |
| Olive oil | 2 tablespoons | Adds flavor and texture |
| Extra flour for dusting | As needed | Prevents sticking during shaping |
Bread flour is crucial for your ciabatta bread recipe because its higher protein content (around 12-14%) develops the strong gluten network needed to support the wet dough and create those beautiful air pockets. While all-purpose flour can work in a pinch, bread flour gives superior results.
Water temperature matters significantly. Room temperature water (around 70-75°F) allows for proper fermentation without killing the yeast or slowing it down too much. The high water content in this ciabatta bread recipe is what creates the open crumb structure that defines authentic ciabatta.
Yeast selection can vary based on your preference. Active dry yeast works perfectly, but you can also use instant yeast (same amount) or fresh yeast (triple the amount). Some advanced bakers even incorporate a poolish or biga (pre-ferment) into their ciabatta bread recipe for enhanced flavor complexity.
Must-Have Equipment for Baking Ciabatta
While you don’t need a professional bakery setup, having the right tools makes your ciabatta bread recipe much easier to execute:
Stand mixer with dough hook: Given the wet, sticky nature of ciabatta dough, a stand mixer is your best friend. Hand-kneading is possible but extremely messy and challenging. The mixer develops gluten without you having to fight with the sticky dough.
Baking stone or steel: This creates the intense bottom heat needed for a crispy crust and good oven spring. If you don’t have one, an inverted heavy baking sheet works as a substitute.
Bench scraper: Essential for handling the sticky dough without deflating it. This tool helps you divide and move the dough with minimal interference.
Parchment paper: Makes transferring your shaped ciabatta to the oven much easier and prevents sticking.
Kitchen scale: Baking by weight rather than volume ensures consistency, which is crucial for a high-hydration ciabatta bread recipe.
Spray bottle: For creating steam in your oven, which helps develop that classic crispy crust.
Step-by-Step Ciabatta Bread Recipe Instructions
Preparing the Dough and First Rise
Now comes the exciting part—bringing your ciabatta bread recipe to life. This process requires patience, but the hands-on work is actually quite minimal.
Step 1: Activate the yeast (10 minutes)
In your stand mixer bowl, combine the warm water with the yeast and let it sit for about 5-10 minutes until it becomes foamy. This step ensures your yeast is alive and active, which is critical for a successful ciabatta bread recipe.
Step 2: Mix the dough (5 minutes)
Add the bread flour, salt, and olive oil to the yeast mixture. Using the dough hook attachment, mix on low speed for 2 minutes until combined. The mixture will look shaggy and wet—this is exactly what you want for your ciabatta bread recipe.
Step 3: Develop the gluten (8-10 minutes)
Increase the mixer speed to medium and knead for 8-10 minutes. The dough will transform from a shaggy mess to a smooth, elastic, but still very sticky mass. It should pull away from the sides of the bowl slightly but remain quite wet. Resist the temptation to add more flour—this high hydration is essential.
Step 4: First fermentation (1.5-2 hours)
Transfer the dough to a lightly oiled large bowl. Cover with plastic wrap or a damp towel and let it rise at room temperature until doubled in size, typically 1.5-2 hours. During this time, the yeast produces carbon dioxide, creating those air pockets that make ciabatta special.
Step 5: Fold the dough (30-second intervals during rise)
About halfway through the first rise (around 45 minutes in), perform a series of gentle folds. This technique, often used in artisan ciabatta bread recipes, strengthens the gluten structure without deflating the dough. Simply wet your hands, grab one edge of the dough, stretch it up, and fold it over itself. Rotate the bowl and repeat 4 times. This step is optional but improves the final texture.
Shaping, Proofing, and Baking Your Ciabatta
The final stages of your ciabatta bread recipe require a gentle touch to preserve all those precious air bubbles you’ve worked so hard to develop.
Step 6: Prepare your work surface (2 minutes)
Generously flour a large work surface or baking sheet. Unlike most bread recipes, where you want minimal flour, ciabatta needs a good coating to handle the sticky dough. Also, prepare a piece of parchment paper dusted with flour.
Step 7: Gently deflate and shape (5 minutes)
Turn the risen dough out onto your floured surface. It will be very soft and puffy—handle it gently to preserve the air structure. Instead of traditional kneading or punching down, simply stretch the dough into a rough rectangle about 1 inch thick. Using a bench scraper, cut the dough in half to create two loaves.
Step 8: Final proofing (30-45 minutes)
Carefully transfer each piece to your floured parchment paper, maintaining the rectangular shape as much as possible. Don’t worry if they look messy—that’s authentic ciabatta character! Dust the tops generously with flour, cover lightly with a towel, and let them proof for 30-45 minutes. They should look puffy but won’t necessarily double in size.
Step 9: Preheat your oven (30 minutes before baking)
Place your baking stone or steel on the middle rack and preheat your oven to 425°F (220°C). This high temperature is crucial for the oven spring that creates those final air pockets in your ciabatta bread recipe.
Step 10: Bake to perfection (20-25 minutes)
Just before baking, create steam by placing a shallow pan on the bottom rack and adding 1 cup of hot water (be careful of the steam!). Alternatively, spray the oven walls with water. Slide the parchment paper with your ciabatta directly onto the preheated stone. Bake for 20-25 minutes until the loaves are golden brown and sound hollow when tapped on the bottom.
Step 11: Cool properly (30 minutes minimum)
This might be the hardest step of the entire ciabatta bread recipe—waiting! Transfer the baked loaves to a cooling rack and resist cutting into them for at least 30 minutes. This cooling period allows the interior crumb structure to set properly.
Baking Timeline for Planning
| Phase | Duration | What’s Happening |
|---|---|---|
| Yeast activation | 10 minutes | Yeast becomes foamy and active |
| Mixing and kneading | 15 minutes | Gluten develops, dough becomes elastic |
| First rise | 1.5-2 hours | Dough doubles, flavors develop |
| Shaping | 5 minutes | Dough formed into ciabatta loaves |
| Final proof | 30-45 minutes | Loaves become puffy and airy |
| Baking | 20-25 minutes | Crust forms, oven spring occurs |
| Cooling | 30+ minutes | Crumb structure sets |
| Total time | 3-4 hours | From start to first slice |
Troubleshooting Your Ciabatta Bread Recipe
Even experienced bakers sometimes encounter challenges when making ciabatta. Here are solutions to common problems:
Dense crumb without holes: This usually indicates insufficient hydration, overworking the dough during shaping, or inadequate fermentation time. Make sure you’re measuring water accurately and giving the dough full rising time.
Dough too sticky to handle: While ciabatta dough should be sticky, if it’s completely unmanageable, you may have added too much water or the flour may have lower protein content. Use more flour on your work surface and bench scraper rather than incorporating it into the dough.
Flat loaves that spread out: This can happen if the dough is over-proofed or if the gluten structure isn’t strong enough. Try reducing the final proofing time or ensuring your kneading time is adequate.
Pale, soft crust: Insufficient oven temperature or lack of steam causes this issue. Ensure your oven is fully preheated and create plenty of steam during the first few minutes of baking.

Elevating Your Ciabatta Bread Recipe
Once you’ve mastered the basic ciabatta bread recipe, you can explore variations that add new dimensions of flavor:
Herb ciabatta: Fold in 2 tablespoons of fresh chopped rosemary, thyme, or basil during the final mixing stage. The herbs add aromatic complexity that pairs beautifully with olive oil or Italian dishes.
Olive ciabatta: Incorporate 1 cup of chopped kalamata or green olives after the initial kneading. The briny, savory notes transform your ciabatta bread recipe into something extraordinary.
Whole wheat ciabatta: Replace up to 30% of the bread flour with whole wheat flour for added nutrition and nutty flavor. You may need to add slightly more water since whole wheat absorbs more liquid.
Overnight ciabatta: For deeper flavor development, after mixing the dough, refrigerate it for 12-24 hours instead of the room temperature rise. Bring it back to room temperature before shaping. This cold fermentation technique is favored in many professional ciabatta bread recipes.
Storing and Serving Your Homemade Ciabatta
Your freshly baked ciabatta is best enjoyed within 24 hours of baking. The high moisture content means it doesn’t stay fresh as long as drier breads. Store it in a paper bag at room temperature to maintain the crispy crust—plastic bags will make the crust soft.
For longer storage, slice the ciabatta and freeze the pieces in a zip-top bag for up to 3 months. Toast frozen slices directly from the freezer for quick, fresh-tasting bread anytime.
Ciabatta shines in numerous applications:
- Panini: The flat shape and sturdy texture make it ideal for pressed sandwiches
- Bruschetta: Toasted ciabatta slices topped with tomatoes, garlic, and basil
- Dipping bread: Serve alongside quality olive oil and balsamic vinegar
- Sandwiches: The open crumb holds ingredients without becoming soggy
- Garlic bread: Slice, brush with garlic butter, and toast until golden
Conclusion
Mastering a ciabatta bread recipe is one of the most rewarding achievements in home baking. Yes, the wet dough can be challenging at first, and yes, it requires patience during the rising and proofing stages, but the result—that crispy-crusted, hole-riddled, aromatic loaf—is absolutely worth every minute. You’ve learned not just a recipe, but a technique that opens doors to countless artisan bread variations.
The beauty of this ciabatta bread recipe is that it gets easier each time you make it. Your hands will learn to work with the sticky dough, your eyes will recognize when the fermentation is perfect, and your kitchen will be filled with the irresistible aroma of freshly baked Italian bread. Each loaf you bake will be better than the last as you develop your intuition and technique.
Don’t be discouraged if your first attempt isn’t picture-perfect. Even slightly imperfect homemade ciabatta tastes infinitely better than store-bought versions. The irregular shape, the uneven holes, the flour-dusted crust—these “imperfections” are actually the hallmarks of authentic, artisan bread.
Ready to transform your kitchen into an Italian bakery? Gather your ingredients, set aside an afternoon, and dive into this ciabatta bread recipe. I’d love to hear about your baking experience—share your results, questions, or creative variations in the comments below. And if you found this guide helpful, share it with fellow bread enthusiasts who dream of mastering artisan baking. Your journey to incredible homemade ciabatta starts now!
Frequently Asked Questions About Ciabatta Bread Recipe
Q: Why is my ciabatta bread recipe dough so much stickier than other bread doughs?
A: The sticky, wet dough is actually what makes ciabatta special! A proper ciabatta bread recipe uses high hydration (75-80% water to flour ratio), which is significantly more than standard bread recipes. This extra moisture creates the large, irregular holes and chewy texture that define authentic ciabatta. Instead of trying to make the dough less sticky by adding more flour, embrace it by using a well-floured work surface, a bench scraper, and wet hands when handling the dough. The stickiness means you’re doing it right!
Q: Can I make a ciabatta bread recipe without a stand mixer?
A: Yes, you can make ciabatta by hand, though it requires a different technique. Instead of traditional kneading, use the “stretch and fold” method. Mix ingredients with a wooden spoon until combined, then let the dough rest for 30 minutes. Over the next 2-3 hours, perform a series of gentle stretches and folds every 30 minutes (4-6 times total). This builds gluten structure without the mess of kneading wet dough. Many bakers actually prefer this method for their ciabatta bread recipe as it’s gentler on the dough structure.
Q: How can I tell when my ciabatta bread recipe is fully baked?
A: There are three reliable indicators that your ciabatta is done. First, the crust should be golden brown and crispy. Second, the internal temperature should reach 205-210°F when measured with an instant-read thermometer inserted into the center. Third, the loaf should sound hollow when tapped on the bottom. If you’re unsure, it’s better to bake a bit longer—underbaked ciabatta will have a gummy interior, while slightly overbaked bread is still delicious.
Q: Can I prepare my ciabatta bread recipe dough in advance?
A: Absolutely! Cold fermentation actually improves flavor in your ciabatta bread recipe. After mixing the dough, place it in the refrigerator for 12-24 hours instead of the initial room temperature rise. The slow, cold fermentation develops more complex flavors. When you’re ready to bake, remove the dough from the refrigerator, let it come to room temperature for about 1 hour, then proceed with shaping, final proofing, and baking as directed. This make-ahead method fits perfectly into busy schedules.
Q: What’s the best flour to use for a ciabatta bread recipe?
A: Bread flour with 12-14% protein content is ideal for ciabatta bread recipe success. The higher protein creates stronger gluten networks that can support the wet dough and maintain the open crumb structure. King Arthur Bread Flour and Bob’s Red Mill Artisan Bread Flour are excellent choices. While all-purpose flour (10-12% protein) can work, you’ll get better oven spring and more dramatic holes with bread flour. Avoid cake or pastry flour, which lacks sufficient protein for this application.

