
The Perfect Ghost OREO Ball Your Ultimate No-Bake Halloween Treat

Do you remember that feeling? The crisp autumn air, the scent of cinnamon and pumpkin spice, and the thrill of planning the perfect Halloween party? You’ve got the spooky decor sorted, the playlist queued up, and the costumes ready to go. Everything is perfect except for one crucial element: the dessert. You need something that’s not just delicious, but also visually wowing and, most importantly, easy to make. Something that lets you focus on the fun, not the fuss.
I’ve been there, facing the annual dilemma of balancing a busy life with a desire to create memorable, homemade holiday treats. That’s why I’m here to tell you about the culinary hero of the season: the Ghost OREO Ball.
Forget complicated baking or spending hours slaving over a hot oven. These delightful, bite-sized truffles are the ultimate no-bake Halloween treat , combining the irresistible crunch of OREO cookies with the creamy tang of cream cheese, all enveloped in a smooth layer of white chocolate. They’re quick, they’re iconic, and they are, quite frankly, adorable. Whether you’re a novice in the kitchen or a seasoned baking enthusiast, creating these spooky little specters is a rewarding experience that will make you the star of any autumnal gathering.
This comprehensive guide will walk you through everything, from the essential ingredients to the expert tips on getting that flawless ghost shape. By the time you’re done, you’ll have the confidence to whip up a batch of the best Ghost OREO Ball treats your friends and family have ever seen. Get ready to twist, blend, and chill your way to Halloween dessert fame with the mighty Ghost OREO Ball !
Easy and fun no-bake Ghost OREO Balls
Ingredients
Method
- Prepare the Base: Line a baking sheet with parchment paper or wax paper.
- Crush OREOS: Add 36 OREO cookies to a food processor and pulse until fine crumbs form (resembling sand texture). Alternatively, place in a zip-top bag and crush with a rolling pin.
- Mix Filling: Pour cookie crumbs into a large mixing bowl. Add softened cream cheese and mix thoroughly using an electric mixer or by hand until fully combined into a truffle-like mixture.
- Shape Balls: Use a small cookie scoop to portion the mixture into balls (approximately 40 total). Roll into smooth spheres with your hands if needed and place on the prepared baking sheet.
- First Chill: Place the entire baking sheet in the freezer for at least 30 minutes to firm up the balls.
- Melt Chocolate: Place white vanilla melting wafers in a microwave-safe bowl. Heat for 30 seconds, stir, then continue heating in 15-second intervals until fully melted and smooth.
- Dip Balls: Remove balls from freezer. Insert a toothpick into each ball as a handle. Quickly dip into melted white chocolate, rotating to coat all sides evenly. Use a spatula to help with coverage.
- Set Coating: Place dipped balls back on parchment paper to harden. If balls become too warm during dipping, return to freezer briefly.
- Decorate: Once chocolate has set, use melted chocolate chips or black decorating gel (placed in a piping bag with a small tip cut) to draw on ghost faces (eyes and mouth).
- Add Details: Optional place candy eye balls on each ghost for added charm.
- Final Set: Allow chocolate to fully harden before serving or storing.
- Store: Keep in an airtight container in the refrigerator until ready to serve.
The Essential Ghost OREO Ball Recipe: Ingredients & Prep
Let’s get down to the core of what makes a Ghost OREO Ball so universally beloved. The beauty is in its simplicity. This isn’t a complex, multi-step baking endeavor. It’s a three-ingredient marvel that requires zero oven time a true champion of easy OREO recipes .
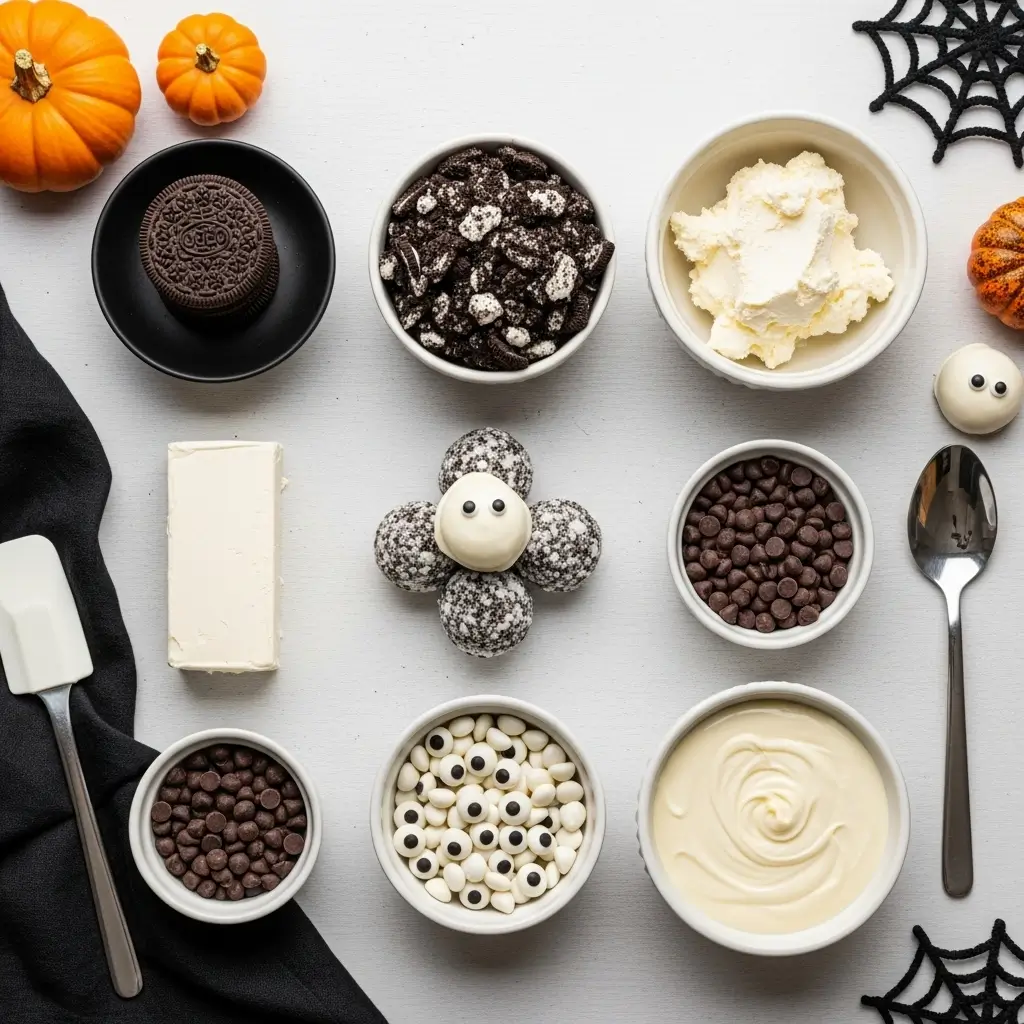
The Magic Trio: Cookies, Cream Cheese, and Coating
To make the perfect batch of Ghost OREO Balls, you only need three main components, plus a little something extra for the spooky ghost faces. You may be surprised at how few ingredients are required to produce such a rich, decadent OREO truffle .
- The OREO Cookies: You’ll need a standard package of OREO cookies. Crucially, use the entire cookie the wafer and the creme filling. This is the foundation of your truffle and where all the chocolatey goodness comes from.
- The Cream Cheese: This is the binder that transforms the cookie crumbs into a decadent, fudgy dough. Crucial Tip: Make sure your cream cheese is completely softened to room temperature. This is non-negotiable for a smooth, lump-free mixture that will form a perfect Ghost OREO Ball.
- The White Chocolate Coating: To achieve that iconic ghostly white appearance, you’ll need white chocolate melting wafers or high-quality white candy melts. These melt smoothly and set up quickly, giving your Ghost OREO Balls that professional, crisp shell.
The final ingredient is, of course, the decoration! You can use miniature semi-sweet chocolate chips, black decorating gel, or even edible marker pens to create the eyes and mouth, bringing your little OREO ghosts to life.
Step-by-Step: Crushing, Mixing, and Chilling the Core
Creating the base for your Ghost OREO Ball is incredibly simple. Follow these steps for the perfect dough consistency:
- Crush: Start by crushing your OREOs. A food processor is your best friend here, turning the cookies into fine, sand-like crumbs in seconds. If you don’t have one, a sturdy zip-top bag and a rolling pin work just as well and they can be a great way to relieve some stress! Reserve a couple of tablespoons of the crumbs for an optional topping later.
- Mix: Combine the crushed OREOs with the softened cream cheese. Mix on low speed with an electric mixer, or get your hands in there, until a thick, uniform “dough” forms. It should be firm enough to roll without being overly sticky. This mixture is the delicious heart of every single Ghost OREO Ball .
- Shape & Chill: The classic Ghost OREO Ball is round, but to create the ghost effect, you’ll want a slightly oblong or bell-like shape. Scoop the mixture and gently mold it into a tapering cone shape with a flat bottom like a classic cartoon ghost. Place these shapes on a parchment-lined baking sheet and chill them for at least 30 minutes. This firming process is vital to ensure your Ghost OREO Ball holds its shape when it meets the warm chocolate.
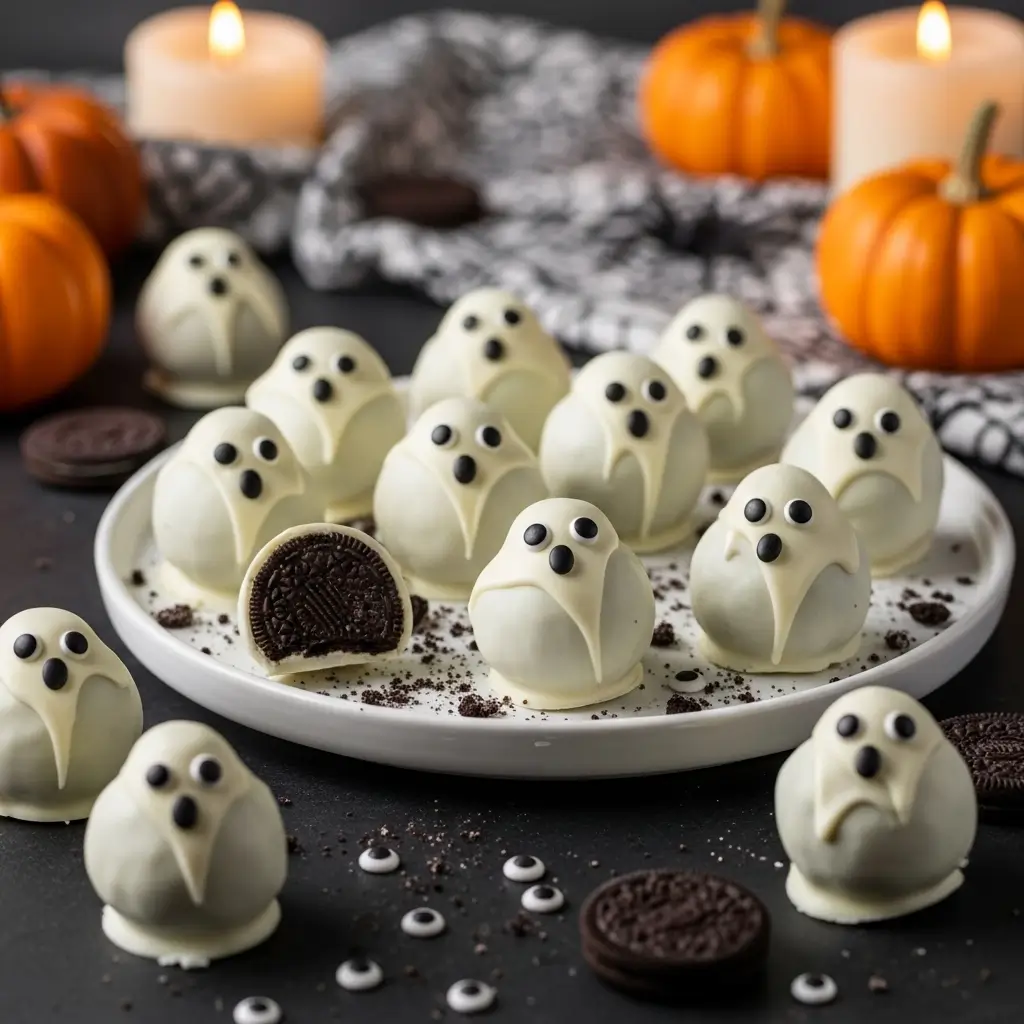
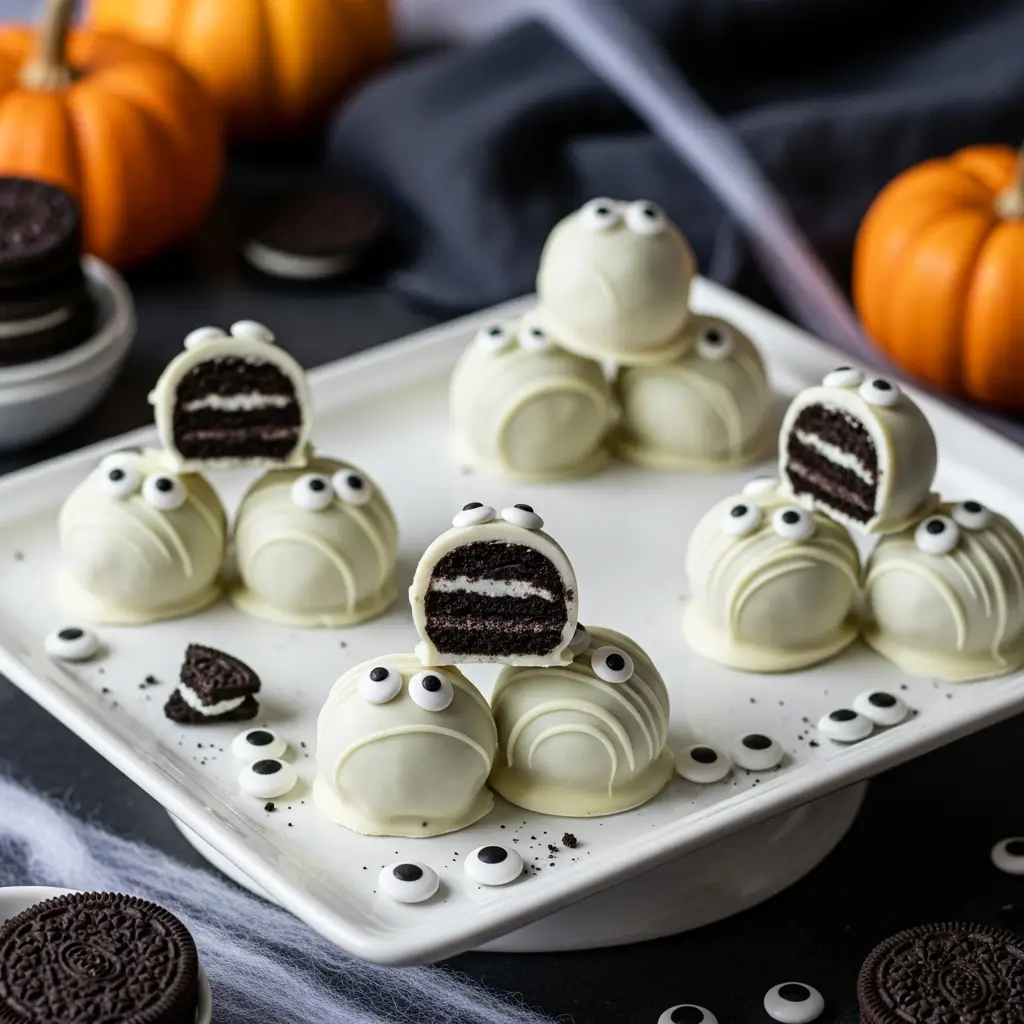
Transforming Your Ghost OREO Balls into Spooky Specters
Once your truffles are chilled and firm, the transformation into a spooky, yet cute, specter begins! This is where you elevate your simple cream cheese OREO ball into a true Halloween masterpiece.
Dipping Perfection: Tips for a Flawless White Chocolate Coat
Dipping is often the trickiest part of making any truffle, but with the right technique, you can achieve a perfectly smooth coating on every single Ghost OREO Ball.
- Melting Safely: Melt your white chocolate candy melts in a microwave-safe bowl in 30-second intervals, stirring after each burst. White chocolate is notorious for seizing or burning, so low and slow is the name of the game. For a very smooth finish, consider adding a teaspoon of shortening or coconut oil to the melted chocolate.
- The Fork Method: Use a candy dipping tool or, more simply, a regular fork to submerge each chilled Ghost OREO Ball . Tap the fork gently against the side of the bowl to allow excess chocolate to drip off. The cooler the truffle, the faster the chocolate sets, minimizing the mess! Place the dipped truffle back on the parchment paper. The chocolate will naturally pool at the bottom, helping to create the classic, flowing shape of a ghost skirt.
- Work Quickly: Since you are dealing with a cold center and warm coating, work in small batches. If your Ghost OREO Balls start to warm up, put the sheet back in the freezer for a few minutes. Speed and cold temperature are the secrets to a perfect Ghost OREO Ball.
Creative Ghost Faces: Easy Ways to Bring Your OREO Ghosts to Life
The final step and arguably the most fun is decorating. This is what truly turns a delicious OREO truffle into a festive, fun Ghost OREO Ball.
- Classic Mini Chip Eyes: The easiest way to create the classic ghost face is by using two miniature semi-sweet chocolate chips for the eyes. Press them gently into the wet white chocolate coating immediately after dipping. The warmth of the setting chocolate will hold them in place. This simple, two-dot face is instantly recognizable and very charming.
- Edible Marker Expressions: For a more detailed or varied look, wait until the white chocolate coating is fully set. Then, use an edible black marker to draw on different expressions a classic open-mouth scream, a shocked oval, or even a comical, winky-face Ghost OREO Ball.
- Black Gel/Melt Details: For a raised, three-dimensional face, melt a tiny bit of black candy melts or use black decorating gel. Transfer the melted chocolate to a small zip-top bag, snip the corner, and pipe on the eyes and mouth. This adds texture and a professional finish to your Ghost OREO Ball .
The Ultimate Ghost OREO Ball Recipe Table
To make your kitchen time as efficient as possible, here is the structured recipe for the perfect batch of Ghost OREO Balls :
| Component | Ingredient | Quantity | Notes |
| The Base | OREO Cookies (including filling) | 36 (1 standard package) | Any flavor works, but classic is best! |
| The Binder | Cream Cheese, full-fat | 8 oz. (1 block) | Must be softened to room temperature. |
| The Coating | White Candy Melts or White Chocolate Wafers | 16 oz. | Avoid standard white chocolate chips for dipping they seize easily. |
| The Eyes | Mini Chocolate Chips or Black Decorating Gel | Approx. 72 pieces | Two per ghost. |
| Optional | Shortening or Coconut Oil | 1 tsp (per 16 oz of coating) | For a smoother, easier-to-dip chocolate. |
Instructions for Ghost OREO Ball Preparation:
- Crush: Process OREO cookies in a food processor until fine crumbs form.
- Mix: Add softened cream cheese to the crumbs. Mix until a uniform dough is created.
- Shape: Form the dough into 36-40 oblong or bell-shaped ghost bodies. Place on a parchment-lined baking sheet.
- Chill: Refrigerate for at least 30 minutes until very firm. This ensures a stable Ghost OREO Ball.
- Melt: Melt white chocolate in 30-second intervals until smooth.
- Dip & Decorate: Dip each chilled Ghost OREO Ball into the melted chocolate using a fork. Allow excess to drip off. Place back on the parchment paper and immediately affix two mini chocolate chip eyes before the coating sets.
- Set: Allow the Ghost OREO Balls to set completely at room temperature or in the refrigerator before serving.
Hosting and Storing Your No-Bake Halloween Treat Masterpiece
You’ve successfully crafted your army of edible spirits! Now, let’s talk about presentation and longevity. These beautiful Halloween cookie balls are meant to be enjoyed, and a few expert tips can ensure they make the biggest impact at your Halloween party dessert spread.
Serving Suggestions: Pairing Your Ghost OREO Balls for Parties
Your Ghost OREO Balls are fantastic stand-alone treats, but here are some creative ways to serve them:
- The Graveyard Platter: Create a spooky landscape! Serve the Ghost OREO Balls on a platter dusted with cocoa powder (the “dirt”). You can even stick a small Milano cookie tombstone (with “RIP” written in black icing) behind each ghost for a classic graveyard scene. This turns a simple treat into a true centerpiece.
- In a “Cauldron”: For a fun presentation, arrange your Ghost OREO Balls in a black decorative cauldron or a large ceramic bowl. Use dry ice (safely!) underneath the serving dish to create a smoky, mystical effect that will draw everyone to your no-bake Halloween treat.
- Paired with Drinks: These rich truffles pair wonderfully with seasonal beverages. Offer them alongside a cold glass of milk (for the kids) or a warm mug of mulled cider or hot chocolate (for the adults) to complement the creamy, chocolate flavor.
Storage Solutions: Keeping Your Ghost OREO Balls Fresh and Firm
The great news about Ghost OREO Balls is that they keep beautifully! Because they contain cream cheese, proper storage is essential to maintain their safety and quality.
- Refrigeration is Key: Always store the finished Ghost OREO Balls in an airtight container in the refrigerator. The cold temperature keeps the cream cheese firm and the chocolate coating crisp. They will last for up to 1-2 weeks when properly refrigerated.
- Freezing for Later: Planning far ahead? You can easily freeze these truffles. Place the finished Ghost OREO Balls in a single layer on a baking sheet to freeze solid, then transfer them to an airtight, freezer-safe container, separating layers with parchment paper. They will last for up to 2 months. Thaw them overnight in the refrigerator before serving to ensure they retain their optimal texture.
- Avoid Heat: Never leave your truffles out in a warm environment for an extended period, as the white chocolate coating will soften and the cream cheese core could spoil. Always keep your Ghost OREO Ball at a cool room temperature or chilled until serving time.
FAQ: All Your Ghost OREO Ball Questions Answered
Here are the answers to the most common questions about this delightful Halloween party dessert .
Q1: Can I use Double Stuf OREOs to make a Ghost OREO Ball?
A: While you can technically use Double Stuf OREOs, it’s generally not recommended for the best texture. The standard OREO cookie has the perfect ratio of cookie wafer to cream filling. Double Stuf often results in a mixture that is too soft and sticky due to the extra cream, making it difficult to roll into a firm Ghost OREO Ball shape that holds up during the dipping process. Stick to the classic OREO for the most reliable results when making your Ghost OREO Ball .
Q2: Why is my white chocolate seizing or becoming clumpy when I dip my truffles?
A: Seizing is typically caused by two factors: overheating the white chocolate or introducing moisture (even a tiny drop of water). To avoid this, melt the white chocolate or candy melts slowly in short bursts, stirring gently each time. Make sure your hands, bowls, and tools are completely dry. If the chocolate does become too thick, try stirring in a teaspoon of shortening or coconut oil to smooth it out for easier dipping of your OREO truffles .
Q3: How do I prevent my Ghost OREO Balls from cracking after the chocolate sets?
A: Cracking occurs when there is a significant temperature difference between the chilled truffle core and the melted chocolate coating. The cold core causes the chocolate shell to harden too quickly, and as the core warms slightly and expands, it can fracture the brittle shell. To prevent this, don’t let your truffles get too cold about 30 minutes in the refrigerator (not the freezer) is usually enough. Also, let your melted white chocolate cool slightly for 5-10 minutes after melting before you begin dipping the Ghost OREO Balls.
Final Thoughts: Your Spooktacular Success Awaits
You now have all the knowledge and tips required to create a batch of show-stopping Ghost OREO Balls. You’ve mastered the simple but powerful combination of the creamy interior and the crisp white chocolate shell. You’ve learned the art of the perfect, ghostly shape and the fun of giving each one a unique, spooky face.
This recipe is more than just a dessert; it’s a simple tradition you can look forward to sharing year after year. It’s the perfect way to infuse a little bit of homemade magic into your next celebration.
Now it’s your turn! Grab those OREOs, get crushing, and don’t forget to take a picture of your finished, adorable army of Ghost OREO Balls!
Ready to try another easy holiday treat? Would you like me to find a recipe for Pumpkin Spice OREO Balls or a guide to making Mummy Dogs for a full Halloween party spread?
