
The Perfect fudgy brownie cookies
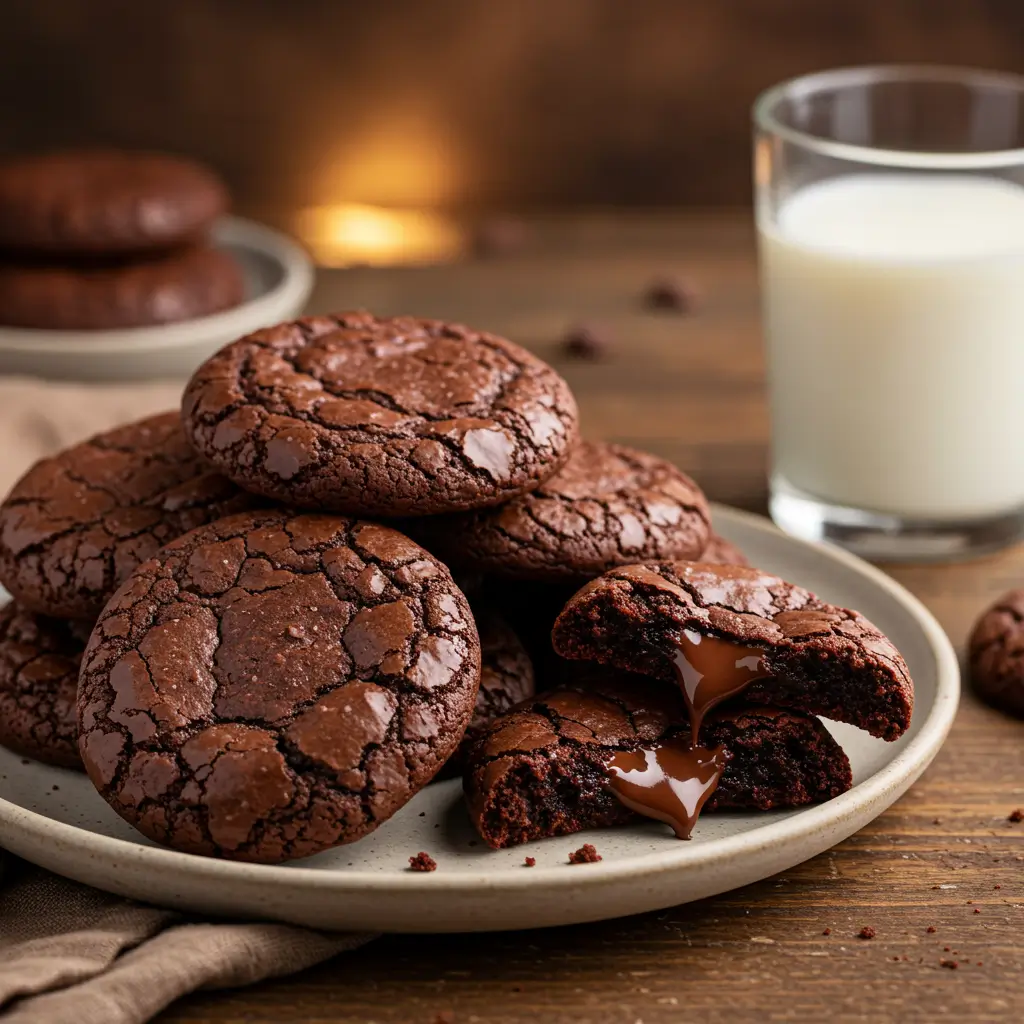
Do you remember that moment? The one where you take your first bite of a baked good, and it’s so decadently perfect that time seems to stop? For us, that moment happens with a perfectly baked brownie cookie. It’s the sweet spot in the dessert universe—the rich, intense cocoa flavor and fudgy interior of a high-quality brownie, coupled with the slightly crisp edges and satisfying chew of your favorite cookie.
But let’s be honest: achieving that elusive, bakery-style perfection can feel like chasing a phantom. You’ve tried recipes promising “fudgy,” only to pull dry, cakey hockey pucks from the oven. You’ve wondered how to get that signature, beautiful, crinkly top that screams “professional.” If you’ve been on a quest for the definitive guide to baking the absolute best brownie cookies , you can finally stop searching.
This comprehensive guide, born from countless kitchen experiments and a deep dive into baking science, is your roadmap to success. We’re going to transform you from an enthusiastic amateur into a brownie cookie master. Get ready to bake cookies that not only taste incredible but look stunning, earning you endless accolades from everyone lucky enough to try them.
The Science Behind Perfect Brownie Cookies: Fudgy vs. Cakey Texture
Understanding the chemical reactions that happen when you combine ingredients is the secret weapon of every great baker. When making brownie cookies , the battle between a fudgy, dense texture and a dry, cakey one is waged primarily through your choice of fat, sugar, and the way you incorporate your eggs. Forget everything you thought you knew; we’re diving into the essential truths of cookie chemistry.
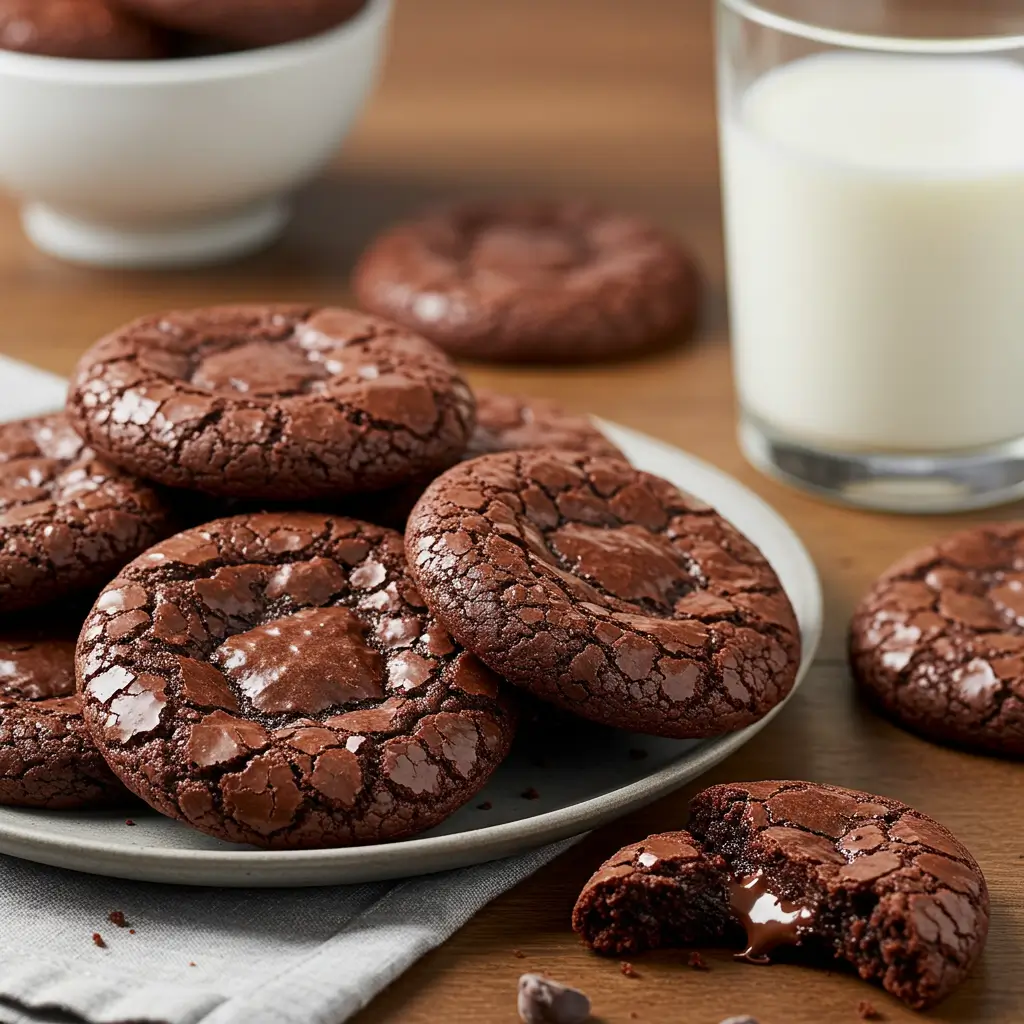
???? Fudgy Brownie Cookies Recipe
The Ultimate Chewy Cookie with a Perfect Crinkle Top
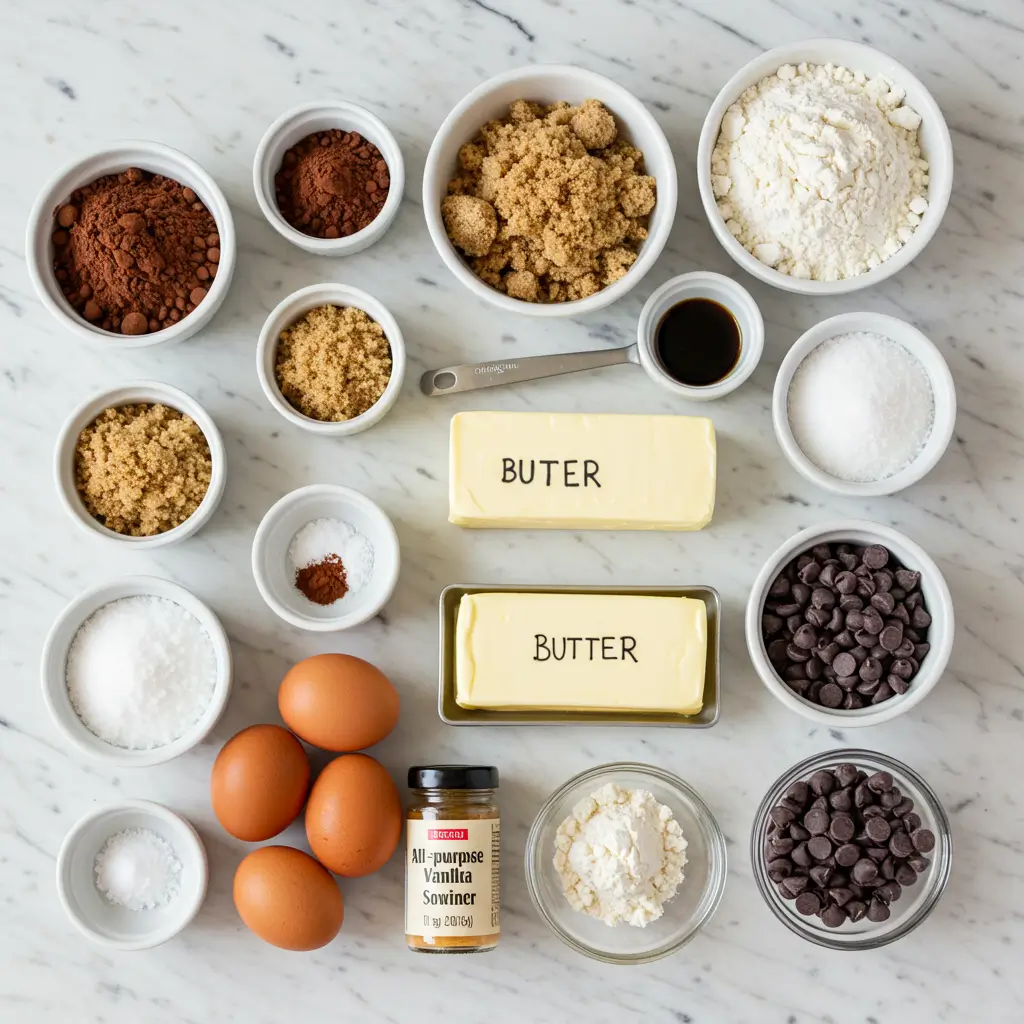
???? Recipe Ingredients (The Ultimate Fudgy Cookie)
⚖️ Editorial Review
✓ Pros
- Achieves the perfect fudgy, dense interior.
- Signature shiny, crackly **crinkle top** is guaranteed.
- Intense, deep chocolate flavor.
- Excellent for making ahead (freezes well).
✗ Cons
- Requires a crucial dough **chilling time** (30 mins).
- Requires mixing the eggs and sugar for **5-8 minutes**.
- The dough is very sticky before chilling.
- Can easily be overbaked (watch the time carefully).
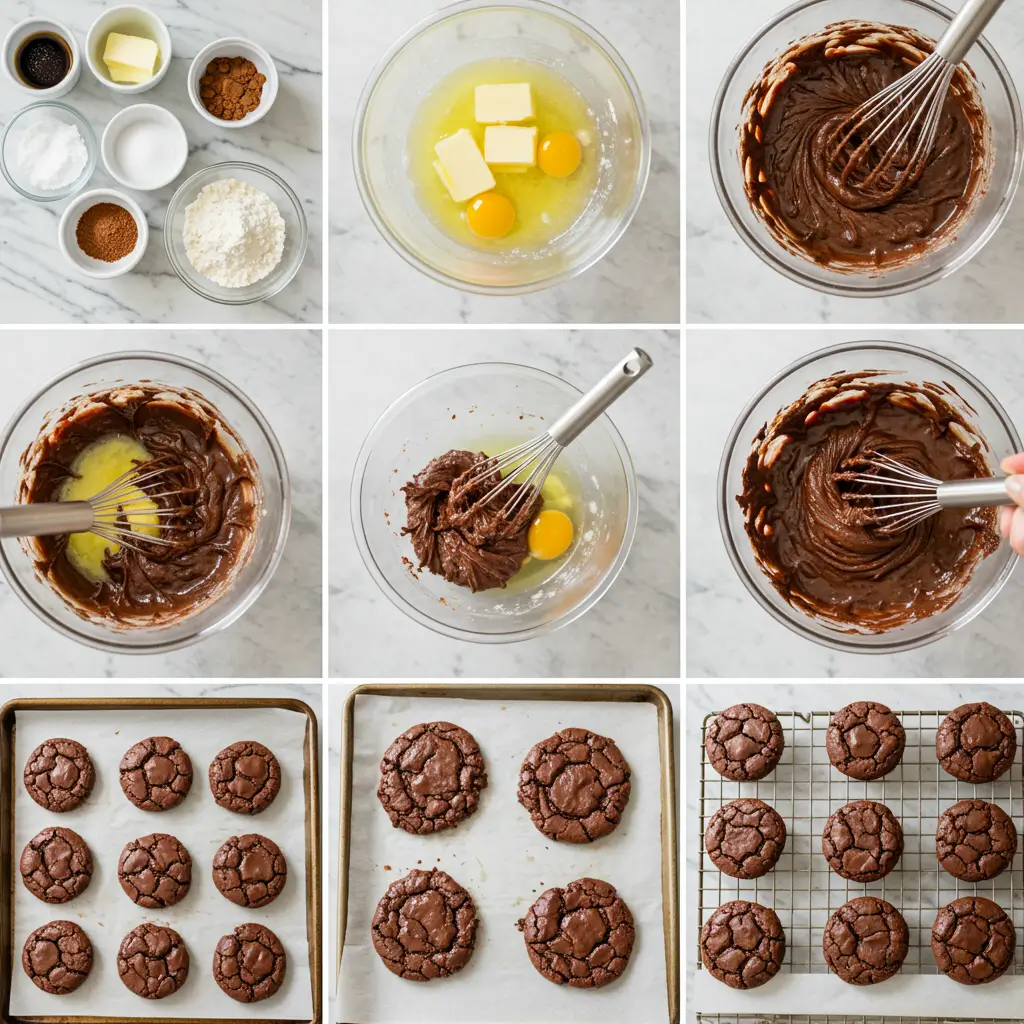
???????? Recipe Instructions
Melt & Whip: Melt butter. In a separate bowl, beat the eggs, sugars, and vanilla on high speed for 5-8 minutes until thick, pale, and ribbony (this creates the crinkle top). Gently mix in the cooled melted butter.
Add Dry & Fold: Whisk together flour, cocoa, baking powder, and salt. Fold the dry ingredients into the wet mixture until *just* combined—do not overmix. Fold in the chocolate chips.
Chill Dough: Scoop the dough onto a parchment-lined sheet and chill in the refrigerator for at least **30 minutes**. Preheat your oven to 350°F (175°C).
Bake: Place the chilled scoops of dough on the baking sheet. Bake for **9-11 minutes**. They should look set on the edges but still slightly soft in the center for fudginess.
Cool: Let the cookies cool on the baking sheet for 5 minutes before transferring them to a wire rack to cool completely. This helps them set and retain their chewy, fudgy texture.
⭐ Customer Reviews & Ratings
???? Leave Your Review
The Crucial Role of Fat and Sugar
The key difference between a cakey cookie and a fudgy one often comes down to your fat source. Most recipes for cakes and cakey brownies use a high amount of oil or creamed butter, which incorporates air and leads to a lighter, less dense structure.
- Melted Butter is Best: For that signature, dense, and fudgy texture in your brownie cookies , you must use melted butter. Melting the butter prevents excess air from being incorporated into the batter, which is what would cause a higher rise and a drier, more cake-like result.
- The Sugar Balance: A mix of both granulated sugar and brown sugar is ideal. Granulated sugar promotes spread and helps form the crackly top. Brown sugar, with its molasses content, adds moisture, a deeper flavor, and that sought-after chewiness. Don’t skimp on the sugar—it’s hygroscopic, meaning it attracts and holds onto water, keeping your brownie cookies moist.
Why Cocoa Powder and Chocolate Matter
Not all chocolate is created equal, and your choice here is critical for the rich flavor profile we’re aiming for.
- Dutch-Process Cocoa is a Must: While natural cocoa powder is fine for some baking, Dutch-process cocoa is essential for the intense, deep chocolate flavor of proper brownie cookies . It has been treated with an alkali solution, neutralizing its acidity. This results in a smoother, darker color and a less bitter, more robust chocolate taste.
- High-Quality Chocolate Chips: Use a good quality semi-sweet or dark chocolate chip (at least 60% cocoa solids). The higher quality chocolate melts better, yielding pockets of gooey decadence throughout your baked brownie cookies.
The ‘Secret’ Ingredient for That Signature Crinkle Top
How do bakeries get that beautiful, shiny, crackly crust on their brownie cookies ? It’s not magic; it’s a simple technique involving the eggs and sugar, often called the “meringue method.”
- The Meringue Method: After you’ve melted your butter and mixed in your sugars, you’ll add the eggs and vanilla. You then need to whisk this mixture aggressively (or beat on high with a stand mixer) for a full 5-8 minutes until it becomes pale, thick, and almost ribbon-like. This process dissolves the sugar and traps air bubbles. As the cookies bake, this sugary layer sets quickly on the surface, cracks slightly as the inside expands, and creates that iconic, beautiful crinkle. This step is non-negotiable for true bakery-style results.
Essential Tools and Ingredients for Your Best Brownie Cookie Recipe
Success in the kitchen often comes down to preparation and using the right equipment. To create the ultimate batch of fudgy brownie cookies , you need to be precise, especially with your measurements.
Must-Have Kitchen Equipment
Precision matters more in baking than in any other form of cooking.
- A Digital Kitchen Scale: This is the most important tool you can own. Flour, cocoa, and sugar can be packed down when scooped, leading to wildly inaccurate volume measurements. Weighing your ingredients (especially the flour and cocoa) is the surest way to guarantee a consistent, perfect result every time you make brownie cookies.
- Cookie Scoops: Using a consistent cookie scoop (ideally a 2 or 3 tablespoon size) ensures that all your cookies are the same size. This is crucial because it means they will all bake evenly and be done at the same time.
- Light-Colored Baking Sheets and Parchment Paper: Dark baking sheets absorb more heat and can cause the bottom of your cookies to burn before the inside is fully cooked. Always use light-colored sheets lined with parchment paper. Parchment prevents sticking and helps regulate the heat.
Decoding Your Ingredient List
Beyond the core ingredients, small additions make a huge difference in the overall depth of flavor.
- Espresso Powder: A small amount of instant espresso powder (1-2 teaspoons) doesn’t make your brownie cookies taste like coffee. Instead, it subtly enhances the chocolate flavor, making it taste deeper and more intense—a secret of professional bakers.
- Vanilla Extract: Use a high-quality pure vanilla extract, not imitation. Vanilla plays a surprisingly important role in rounding out the bitterness of the cocoa and adding complexity.
- Salt: Don’t forget the salt in the batter, which balances the sweetness. For an extra touch, a sprinkle of flaky sea salt on top of the dough balls before baking elevates the flavor and visual appeal of your finished brownie cookies.
Troubleshooting Common Baking Mistakes
Even the best bakers run into issues. Here are the most common problems when making brownie cookies and how to fix them.
| Problem | Potential Cause | The Fix for Perfect Brownie Cookies |
| Too Cakey/Dry | Overmixing the flour or using too much flour. | Weigh your flour. Mix in the dry ingredients only until just combined. Use melted butter (as discussed above). |
| Spread Too Thin | Dough was too warm or not enough flour. | Chill the dough for at least 30-60 minutes. Re-measure the flour or cocoa accurately. |
| No Crinkle Top | Not enough air whipped into the egg/sugar mixture. | Beat the egg/sugar mixture for a full 5-8 minutes until thick and pale yellow. This step is crucial for the perfect brownie cookies . |
| Burnt Bottoms | Dark baking pan or oven temperature is too high. | Use a light-colored metal pan and an oven thermometer to verify your oven temp. Always use parchment paper. |
Step-by-Step: Baking the Ultimate Fudgy Brownie Cookies
Now for the main event: the process. Follow these steps precisely, and you will achieve that magnificent, fudgy texture and crackly crust that defines the best brownie cookies .
Prep Work: Chilling the Dough
If you want thick, chewy, bakery-style brownie cookies , this step is non-negotiable.
- Why Resting is Essential: After mixing, the flour hasn’t had time to fully absorb the moisture in the dough. Chilling the dough allows the flour to hydrate fully. More importantly, it solidifies the fat (butter). When the cold dough hits the hot oven, the edges set quickly before the butter fully melts, preventing excessive spread and ensuring your cookies are thick, dense, and chewy.
- How Long to Chill: Scoop your dough balls onto a baking sheet and then chill them for at least 30 minutes. For an even more intense flavor, you can chill the dough overnight.
Precision Baking and The Under-Bake Rule
Knowing exactly when to pull your cookies from the oven is the fine line between fudgy and dry.
- Identifying Doneness: Bake your brownie cookies at a lower temperature (around 350∘F or 175∘C) to allow the center to cook slowly. The key is to under-bake them slightly. When you pull them out, the centers should still look soft, slightly underdone, and maybe a little jiggly. The edges should be set, and the crinkle top should be fully formed.
- The Carry-Over Effect: The cookies will continue to cook on the hot baking sheet for 5-10 minutes after being removed from the oven. This is the “carry-over” cooking effect. Pulling them at the right time ensures that by the time they’ve cooled, the centers are perfectly fudgy. If you wait until they look completely “done” in the oven, they will be over-baked and dry once cool.
The Art of the Perfect Finish
A few final touches ensure your brownie cookies are the stuff of legend.
- Cooling Time: Immediately slide the parchment paper and cookies off the hot metal baking sheet onto a wire rack. Cooling on the hot sheet would continue the cooking process, potentially drying them out.
- The Sea Salt Sprinkle: If you didn’t add the sea salt before baking, a light sprinkle of flaky sea salt on the warm cookies right as they come out of the oven is a game-changer. The salt enhances the richness of the chocolate dramatically.
- Serving and Storing: These decadent brownie cookies are best enjoyed slightly warm, perhaps with a scoop of vanilla ice cream. Store them in an airtight container at room temperature for maximum freshness.
The Ultimate Fudgy Brownie Cookie Recipe
Here are the precise ingredients, measured by weight for the best results, to bake your perfect batch of brownie cookies :
| Ingredient | Weight (Grams) | Volume (U.S. Cups) | Notes |
| Unsalted Butter | 113g | 1/2 Cup (1 Stick) | Must be fully melted and warm. |
| Granulated Sugar | 200g | 1 Cup | Promotes spread and crinkle top. |
| Brown Sugar | 50g | 1/4 Cup | Adds chewiness and moisture. |
| Large Eggs | 100g (Approx. 2) | N/A | Essential for structure and crinkle. |
| Vanilla Extract | 10ml | 2 Teaspoons | Use high-quality pure vanilla. |
| All-Purpose Flour | 125g | 1 Cup | Weigh for precision—do not scoop and level! |
| Dutch-Process Cocoa | 30g | 1/4 Cup | For deep, rich chocolate flavor. |
| Baking Powder | 5g | 1 Teaspoon | Provides necessary lift. |
| Fine Sea Salt | 3g | 1/2 Teaspoon | Balances the sweetness. |
| Chocolate Chips/Chunks | 170g | 1 Cup | Use high-quality dark chocolate. |
Creative Variations and Storage Hacks for Brownie Cookies
Once you’ve mastered the basic recipe, the door opens to endless possibilities. Your perfect brownie cookies are just the beginning!
Delicious Flavor Twists
You can easily adapt your base recipe for a variety of seasonal or craving-specific flavors:
- Mint Chocolate Brownie Cookies: Add 1 teaspoon of peppermint extract along with the vanilla. Press a small piece of Andes mint or a peppermint patty into the center of the dough ball before baking.
- Mocha Brownie Cookies: Add 2 teaspoons of instant espresso powder to the dry ingredients for a richer, coffee-enhanced flavor.
- S’mores Brownie Cookies: Press a large marshmallow half onto the dough during the last 2 minutes of baking, and top with graham cracker crumbs after they come out of the oven.
Making Ahead: Freezing Dough and Baked Cookies
The best way to ensure you’re never far from a warm, fudgy cookie is to prep ahead!
- Freezing Dough: Scoop the chilled dough into balls and place them on a parchment-lined baking sheet. Freeze until solid (about 2 hours). Transfer the frozen dough balls to a freezer-safe zip-top bag or container. They will last for up to 3 months. Baking from Frozen: Bake directly from frozen, adding 2-4 minutes to the total baking time. This is a game-changer for spontaneous cravings!
- Freezing Baked Cookies: Once the cookies are completely cooled, place them in an airtight, freezer-safe container, separated by sheets of parchment paper. They can be frozen for up to 2 months. Thaw them at room temperature or warm them quickly in the microwave for a just-baked taste.
Gluten-Free and Vegan Swaps
With a few adjustments, everyone can enjoy a decadent brownie cookie.
- Gluten-Free: Substitute the All-Purpose Flour with a high-quality 1:1 Gluten-Free baking blend that contains xanthan gum. No other changes are typically necessary.
- Vegan: Replace the butter with a non-dairy butter alternative (like Miyoko’s or Earth Balance sticks) and ensure your chocolate is dairy-free. Use a flax egg substitute (1 tablespoon flaxseed meal + 3 tablespoons water, mixed and rested for 5 minutes) for each large egg in the recipe. The texture will be slightly different, but the flavor will remain rich and decadent.
Conclusion
You now possess the knowledge—the science, the tools, and the precise steps—to move beyond mediocre attempts and bake truly world-class, fudgy, and beautiful brownie cookies .
We’ve covered everything from the necessity of melted butter for density, the magic of the egg-whipping technique for that perfect crinkle, and the critical importance of under-baking for chewiness. Baking is a science, but it’s a science you can absolutely master. The next time you crave that perfect chocolate experience, you’ll know exactly how to achieve it. No more dry, disappointing cookies for you!
Now it’s your turn! Try this recipe today, implement the chilling and whipping steps, and share your results in the comments below. What flavor variation are you going to try first?
Frequently Asked Questions
How long do brownie cookies last?
When stored properly in an airtight container at room temperature, freshly baked brownie cookies will maintain their quality and fudgy texture for about 3-4 days. After that, they may begin to dry out slightly. For longer storage, see the freezing tips in the section above!
Can I make brownie cookies without a mixer?
Yes, you absolutely can! While an electric mixer is ideal for the crucial step of whipping the eggs and sugar to achieve the best crinkle top, you can use a balloon whisk and good old-fashioned elbow grease. Just be prepared to whisk vigorously for a full 5-8 minutes until the mixture turns noticeably pale and thick. This is the one part of the recipe where effort truly pays off for perfect brownie cookies.
What makes brownie cookies spread too much?
There are a few common culprits when brownie cookies spread too thin: 1. Dough Temperature: The dough wasn’t chilled long enough (or at all). 2. Fat Temperature: The melted butter was too hot when added, causing the dough to be too warm. 3. Over-Mixing: Over-mixing the flour can develop too much gluten, leading to spread. Ensure you chill your dough for at least 30 minutes, and only mix in the dry ingredients until just combined.

Recent Customer Reviews
Anna Davis ✓ Verified Baker
October 10, 2025
These are the absolute best brownie cookies I have ever made! That trick of whipping the eggs and sugar for eight minutes really works; the **crinkle top** was perfect and shiny. The cookies are dense, chewy, and taste exactly like a rich, fudgy brownie. Don’t skip the chill time—it’s essential for structure!
Tom Lee
October 10, 2025
A fantastic chocolate flavor! They baked up perfectly in **10 minutes** for a chewy center. My only issue was how sticky the dough was before I chilled it, but the chilling process made it easy to scoop. Highly recommend for any chocolate lover!