
The Ultimate Apple Crisp Recipe: Easy, Irresistible & Perfect for Fall
There’s a certain magic that fills a home when apple crisp is in the oven. It’s more than just a dessert; it’s a warm, cinnamon-spiced hug. It’s the scent of crisp autumn air, the joy of harvest, and the pure, uncomplicated comfort of a homemade treat. Can you smell it now? That tender, bubbling fruit beneath a blanket of buttery, crunchy oat topping is a universal signal that all is right in the world.
Whether you’re a seasoned baker or a complete novice in the kitchen, the humble apple crisp is your gateway to dessert-hero status. It asks for so little just a few simple ingredients, a bowl, and a bit of love and gives back so much. This guide isn’t just a recipe; it’s a deep dive into creating the most unforgettable, perfectly balanced apple crisp of your life. Let’s create some magic together.
Why This Is the Best Easy Apple Crisp Recipe You’ll Ever Make
You might be wondering what sets this particular apple crisp apart from the countless others out there. The answer lies in its perfect balance of simplicity, texture, and flavor. This apple crisp recipe is designed to be foolproof, delivering a dessert that is consistently delicious every single time you make it.
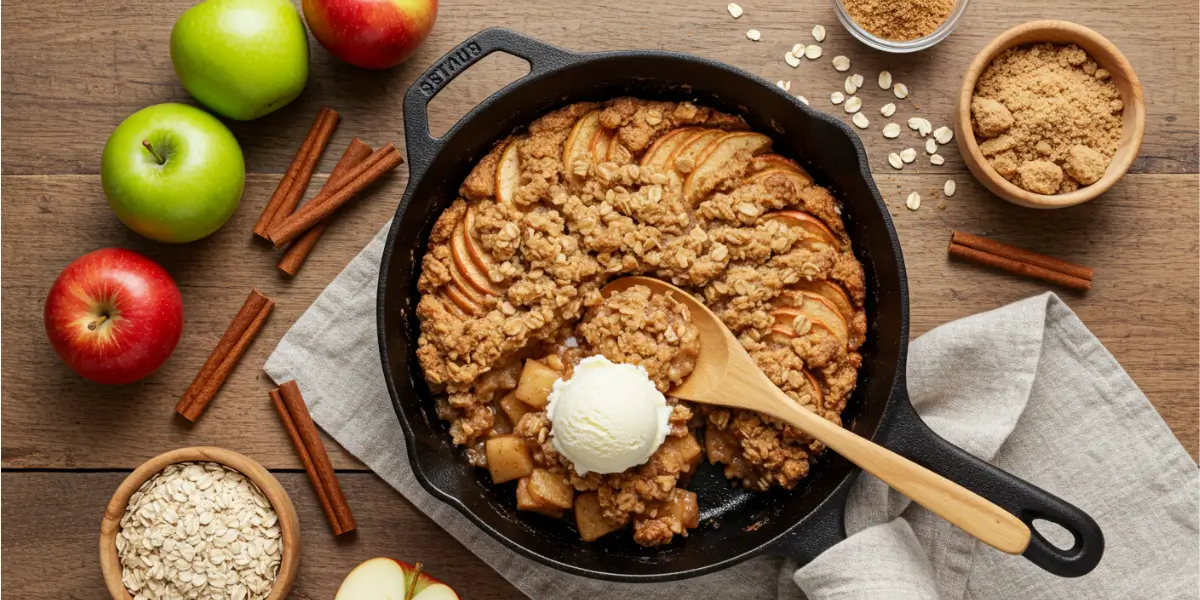
Apple Crisp recipe
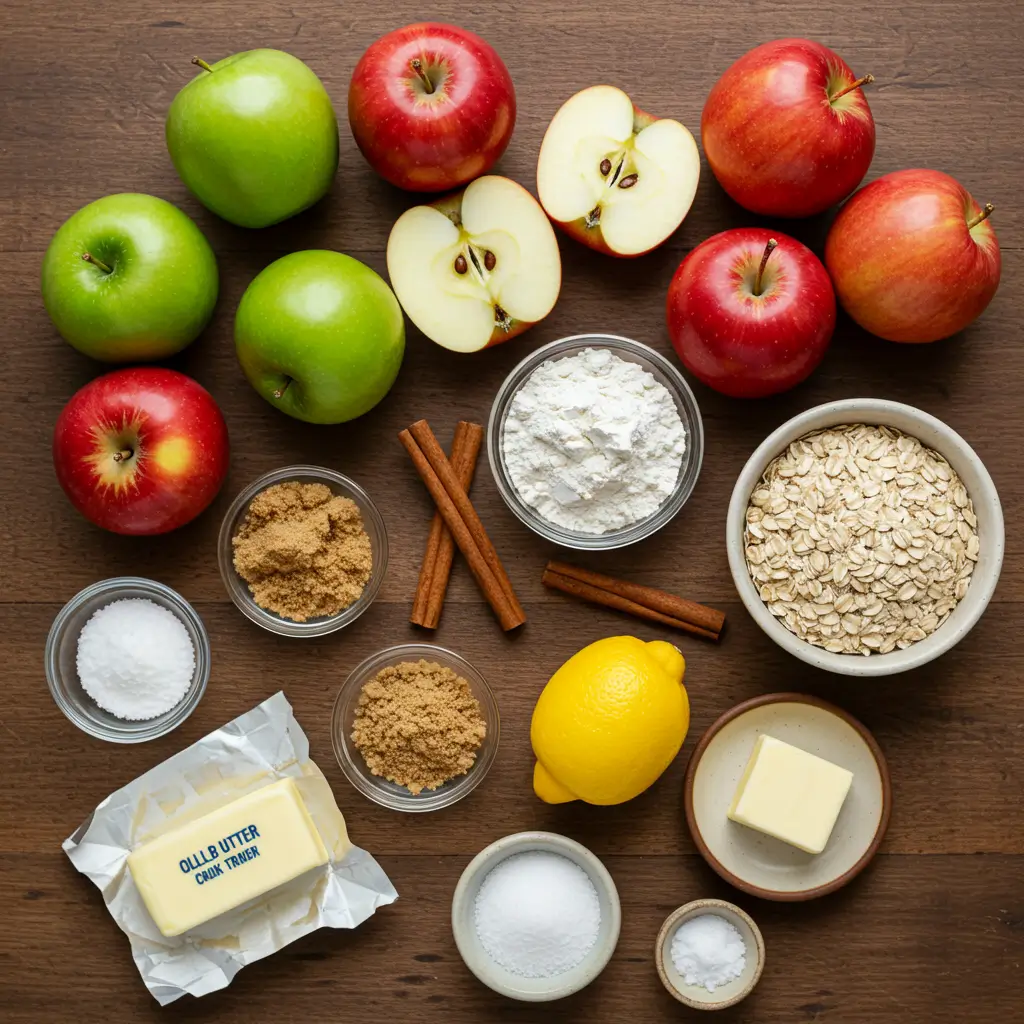
Ingredients
For the Apple Filling:
- 6 cups Apples peeled, cored, and sliced; such as Granny Smith, Honeycrisp, or a mix
- 2 tablespoons Granulated Sugar
- 1 tablespoon All-Purpose Flour
- 1 teaspoon Ground Cinnamon
- 1 tablespoon Lemon Juice
For the Crisp Topping:
- 3/4 cup All-Purpose Flour
- 3/4 cup Old-Fashioned Rolled Oats
- 2/3 cup Brown Sugar packed
- 1/2 teaspoon Ground Cinnamon
- 1/4 teaspoon Salt
- 1/2 cup 1 stick Cold Unsalted Butter (cut into small cubes)
Instructions
- Preheat Oven & Prepare Pan: Preheat your oven to 375°F (190°C). Grease a 9×9 inch baking dish or a similar-sized pie dish.
- Make the Apple Filling: In a large bowl, combine the sliced apples, granulated sugar, 1 tablespoon of flour, 1 teaspoon of cinnamon, and lemon juice. Toss until the apples are evenly coated. Transfer the mixture to the prepared baking dish and spread it into an even layer.
- Make the Crisp Topping: In the same bowl (no need to wash it), combine the 3/4 cup flour, rolled oats, brown sugar, 1/2 teaspoon cinnamon, and salt. Stir to blend.
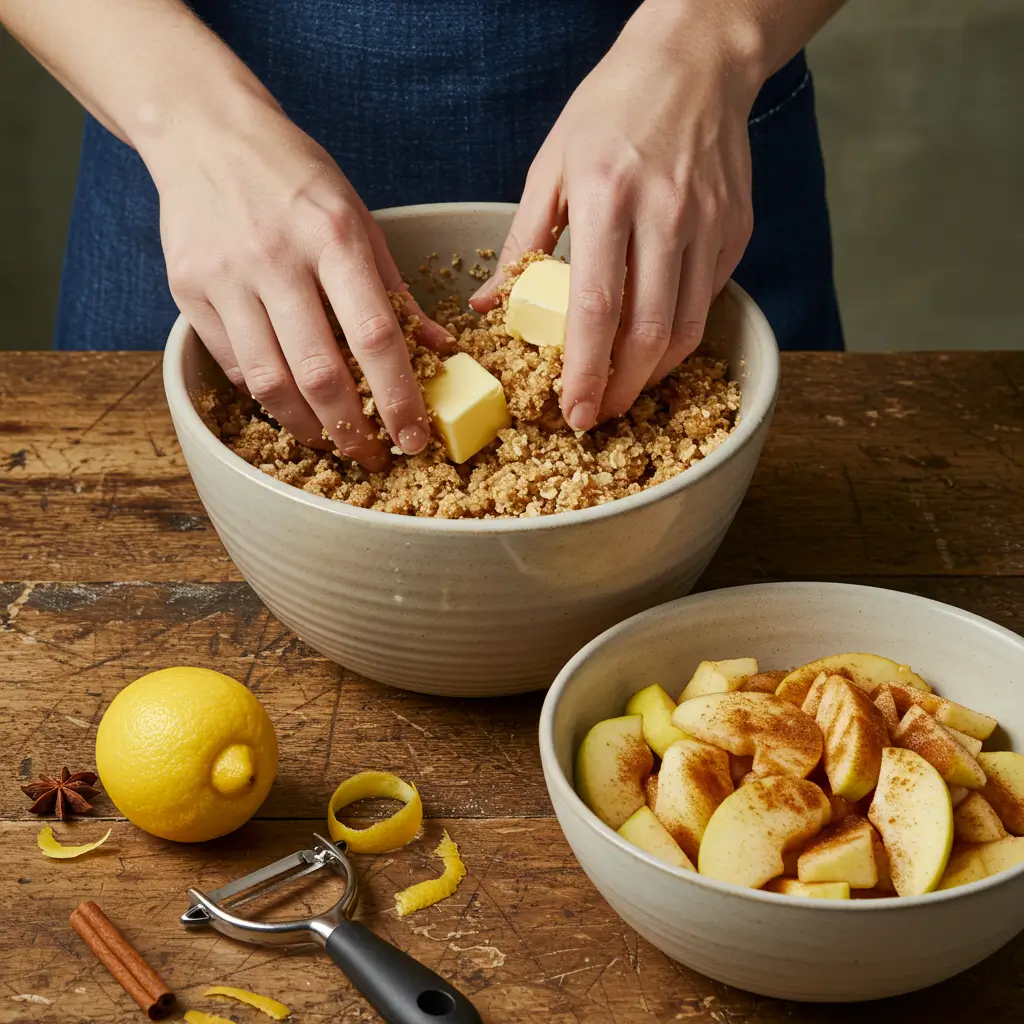
- Add the Butter: Add the cold, cubed butter to the oat mixture. Use a pastry cutter, two forks, or your fingertips to work the butter into the dry ingredients until the mixture is crumbly and the butter is about the size of peas.
- Assemble the Crisp: Sprinkle the oat topping evenly over the apple filling in the baking dish.
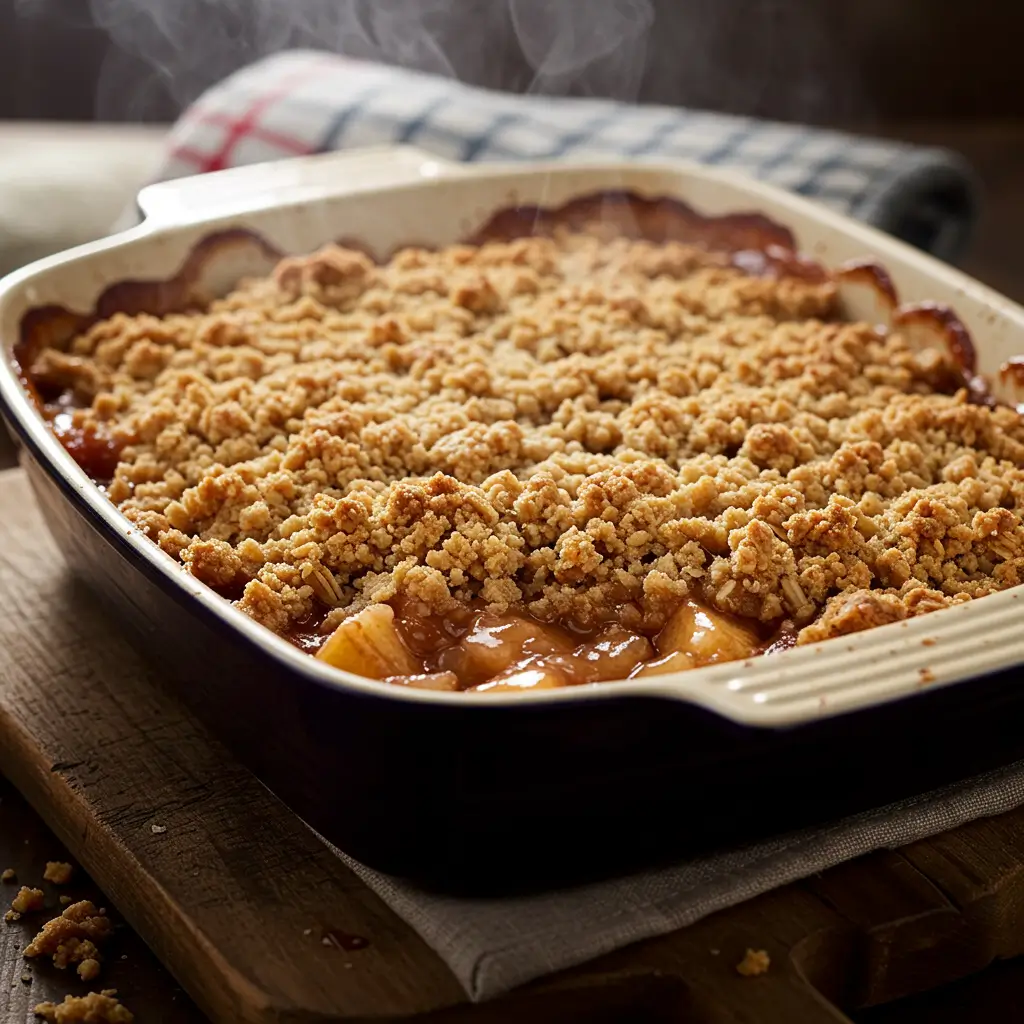
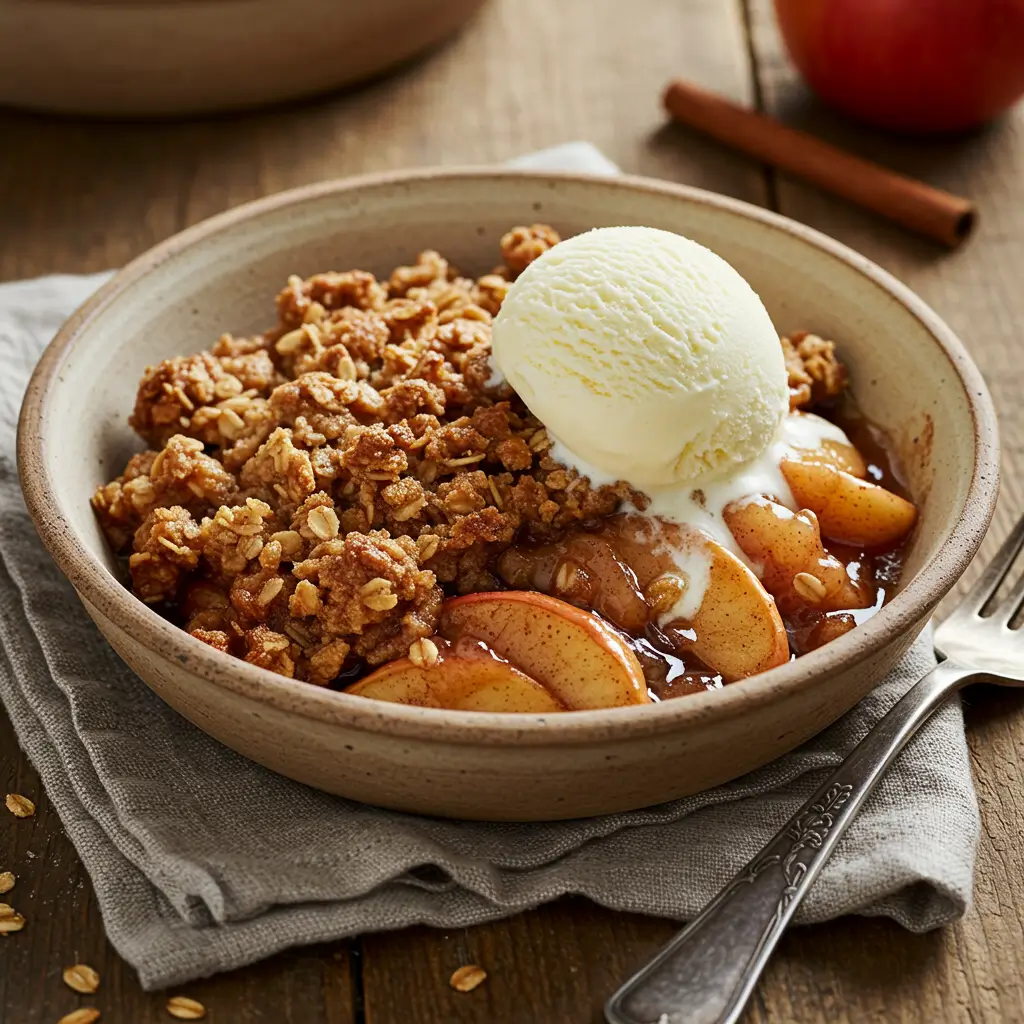
- Bake: Place the dish in the preheated oven and bake for 40-50 minutes, or until the topping is golden brown and the apple filling is bubbly around the edges.
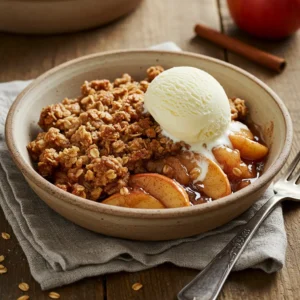
- Cool and Serve: Remove from the oven and allow it to cool for at least 15 minutes before serving. This allows the filling to thicken. Serve warm, ideally with a scoop of vanilla ice cream.
The Simplicity of a No-Fuss Dessert
Unlike its cousin, the apple pie, a classic apple crisp requires no finicky pastry dough. There’s no chilling, rolling, or crimping involved. This easy apple crisp recipe is about embracing imperfection. The filling comes together in minutes, and the topping is made by simply combining ingredients in a single bowl with your fingers. It’s the perfect project for a lazy Sunday afternoon or a last-minute weeknight treat that feels special.
The Magic of the Oatmeal Crumble Topping
The crowning glory of any great apple crisp is, without a doubt, the topping. Our recipe uses old-fashioned rolled oats, which provide a hearty, chewy texture that is simply irresistible. Combined with cold butter, flour, and brown sugar, it bakes up into a golden, crispy, and craggy crust that provides the perfect textural contrast to the soft, juicy apples beneath. This isn’t a sandy streusel; it’s a substantial, crunchy blanket that makes the dessert.
Endlessly Customizable to Your Taste
One of the greatest strengths of this easy apple crisp recipe is its versatility. Are you feeding a crowd with dietary restrictions? No problem. You can easily adapt this apple crisp to be gluten-free by using a 1:1 gluten-free flour blend. Make it vegan by swapping the butter for a plant-based alternative. Want to add a personal twist? A handful of chopped pecans, a dash of nutmeg, or even a handful of fresh cranberries can transform it into your signature dish.
Choosing the Best Apples for Your Apple Crisp
The foundation of any exceptional apple crisp is, of course, the apples. The variety you choose will dramatically impact the final texture and flavor of your dessert. You want apples that can hold their shape and offer a balance of sweet and tart notes after a long bake.
The Tart & Firm Champion: Granny Smith
Granny Smith apples are the gold standard for baking, and for a good apple crisp, they are often the first choice. Their bright, tart flavor cuts through the sweetness of the topping and filling, providing a beautiful balance. More importantly, they are exceptionally firm, meaning they won’t turn into complete mush during baking. You’ll be rewarded with tender, distinct slices of apple in every bite.
Sweet and Soft Alternatives
If you prefer a sweeter, softer apple crisp, you have excellent options. Braeburn, Honeycrisp, and Fuji apples are fantastic choices. They are inherently sweeter, so you might consider reducing the sugar in the filling slightly. They also break down more, creating a saucier, almost apple-butter-like consistency that many people adore.
The Power of the Apple Blend
For the most complex and well-rounded flavor, I highly recommend using a blend of apples. Combining a tart apple like Granny Smith with a sweeter, aromatic apple like Honeycrisp or Jonagold gives you the best of both worlds. You get the structural integrity and tang from one, and the floral sweetness and sauciness from the other. This blend creates a truly next-level apple crisp experience.
Here’s a quick guide to help you choose:
| Apple Variety | Flavor Profile | Texture When Baked | Best For |
|---|---|---|---|
| Granny Smith | Very Tart, Tangy | Holds shape very well | A balanced, classic apple crisp |
| Honeycrisp | Sweet, Mildly Tart | Softens but holds some shape | A sweeter, juicier apple crisp |
| Braeburn | Sweet & Spicy | Holds shape well | A fragrant, firm apple crisp |
| Jonagold | Sweet & Tart | Breaks down somewhat | A saucy, flavorful apple crisp blend |
| McIntosh | Very Sweet, Aromatic | Becomes very soft & saucy | A sauce-forward, no-chunk apple crisp |
Crafting the Perfect Apple Crisp Topping: A Step-by-Step Guide
Let’s talk about the star of the show: that irresistible, crunchy, buttery apple crisp topping. Achieving the perfect crumbly-yet-crispy texture is a science, but a very simple one.
The Golden Ratio of Flour, Oats, and Sugar
A balanced apple crisp topping relies on the right proportions. Our recipe uses a foundation of all-purpose flour for structure, old-fashioned rolled oats for chew and crunch, and a combination of granulated and brown sugar. The brown sugar is non-negotiable its molasses content adds moisture, depth of flavor, and helps the topping caramelize beautifully. The ratio is key to a topping that clumps together perfectly without becoming a solid, doughy slab.
The Secret to a Crispy, Crunchy Topping
The single most important secret? COLD BUTTER. Do not use softened or melted butter. When you use cold butter and incorporate it with your fingertips or a pastry cutter, you create little pockets of fat within the dry ingredients. As the apple crisp bakes, these pockets of butter melt, releasing steam and creating a flaky, crispy texture. If the butter is soft, it will absorb into the flour and create a denser, cookie-like topping.
Troubleshooting a Soggy or Burnt Topping
A soggy topping is often the result of under-baking or a filling that releases too much liquid. To avoid this, ensure your bake time is long enough for the filling to be bubbling vigorously at the edges. If the top is browning too quickly before the filling is done, simply tent the dish loosely with aluminum foil for the remainder of the bake time. This will shield the topping from direct heat, allowing the apples to cook through without burning the crumble.
Your Complete, Foolproof Apple Crisp Recipe
This is it the moment we’ve been building towards. This classic apple crisp recipe is your new go-to. It’s written with clear, easy-to-follow instructions to guarantee your success.
Gathering Your Ingredients
You likely have most of these ingredients in your pantry right now. Here’s everything you’ll need for this perfect apple crisp:
| Component | Ingredient | Quantity | Notes |
|---|---|---|---|
| Apple Filling | Apples (peeled, cored, sliced) | 6–7 cups (about 3 lbs) | A blend of Granny Smith & Honeycrisp is ideal |
| Granulated Sugar | 1/4 cup | Adjust based on apple sweetness | |
| All-Purpose Flour | 2 tbsp | Thickens the apple juices | |
| Lemon Juice | 1 tbsp | Brightens flavor and prevents browning | |
| Ground Cinnamon | 1 tsp | ||
| Pinch of Salt | 1/4 tsp | Enhances all flavors | |
| Crisp Topping | All-Purpose Flour | 3/4 cup | |
| Old-Fashioned Rolled Oats | 3/4 cup | Do not use instant oats | |
| Brown Sugar, packed | 3/4 cup | Light or dark works | |
| Cold Unsalted Butter, cubed | 1/2 cup (1 stick) | ||
| Ground Cinnamon | 1/2 tsp | ||
| Pinch of Salt | 1/4 tsp |
The Step-by-Step Process
- Prep and Preheat: Preheat your oven to 375°F (190°C). Lightly grease a 9×9 inch or a 2-quart baking dish.
- Make the Filling: In a large bowl, toss the sliced apples with the lemon juice. Add the 1/4 cup granulated sugar, 2 tablespoons of flour, 1 teaspoon of cinnamon, and a pinch of salt. Toss until the apples are evenly coated. Pour the mixture into your prepared baking dish and spread it into an even layer.
- Create the Topping: In the same bowl (no need to wash it!), whisk together the 3/4 cup flour, 3/4 cup rolled oats, 3/4 cup brown sugar, 1/2 teaspoon cinnamon, and a pinch of salt. Add the cold, cubed butter. Using your fingertips, a pastry cutter, or even two forks, work the butter into the dry ingredients until the mixture resembles coarse crumbs. You want a variety of sizes some small pebbles and some larger clumps. This is what creates the perfect texture.
- Assemble and Bake: Sprinkle the oat topping evenly over the apple filling. Do not press it down. Place the baking dish on a rimmed baking sheet (to catch any potential bubble-overs) and bake for 40-50 minutes. The apple crisp is done when the filling is bubbling actively around the edges and the topping is a deep, golden brown.
Baking, Serving, and Storing Tips
- Resting is Crucial: Let the apple crisp rest for at least 15-20 minutes after pulling it from the oven. This allows the bubbling filling to thicken slightly.
- Serve it Warm: This dessert is best served warm. A scoop of vanilla ice cream or a dollop of freshly whipped cream is the traditional and highly recommended accompaniment.
- Storage: Store any leftover apple crisp covered in the refrigerator for up to 4 days. Reheat individual portions in the microwave or the entire dish in a 350°F oven until warm.
Conclusion
Mastering the perfect apple crisp is a culinary achievement that pays dividends for a lifetime. It’s a dessert that speaks the language of home, comfort, and shared joy. With this guide, you’re now equipped not just with a recipe, but with the knowledge and confidence to create a truly spectacular apple crisp every time. You understand the importance of apple variety, the science behind the crispy topping, and the simple techniques that make all the difference. So, go ahead, preheat that oven, and fill your kitchen with the unforgettable, welcoming aroma of a homemade apple crisp.
Frequently Asked Questions (FAQ)
What is the difference between an apple crisp and an apple crumble?
This is a common point of confusion! The primary difference lies in the topping. A classic apple crisp contains oats in its streusel-like topping, which bakes up crispy and crunchy. An apple crumble, on the other hand, typically uses a simpler topping of just flour, sugar, and butter, resulting in a softer, more “sandy” or “cakey” texture. So, if your recipe has oats, you’re making a true apple crisp.
Can I make this apple crisp recipe ahead of time?
Absolutely! You can prepare this apple crisp in two ways for make-ahead convenience. First, you can assemble the entire dish, cover it tightly, and refrigerate it for up to 24 hours before baking. You may need to add a few extra minutes to the baking time since it will be going into the oven cold. Second, you can freeze the unbaked apple crisp for up to 3 months. Bake from frozen, covered with foil for the first 30 minutes, then uncover and continue baking until bubbly and golden
Now that you have the ultimate guide, it’s your turn! Gather those apples and create your own comforting masterpiece. We’d love to hear how your apple crisp turns out share your photos and stories in the comments below!
Are You Try This Recipe ?
There are no reviews yet. Be the first one to write one.
